 SketchUp
5. Custom attributes and axes
First of all in this tutorial, an interesting thing you may encounter in your DCs.
If you have followed the last lesson, you should have a simple dynamic component called "DC1". (If not, go back to the lesson to create it or download it from 3D Warehouse.) Now go to the components window and make several duplicates of the wall/window. Click to open one of the copy's window. You should see all of the windows in each copy open in unison. This is not usually a good thing – if you have several doors in a building, you don't want them all to open at the same time.

I'm not sure why this happens, not being a SketchUp developer, but I know how to fix it: create custom attributes.
What are custom attributes?
As their name suggests, these are attributes which you define yourself. You can give them any name (as long as they start with a letter, have no spaces and are not the same as existing attributes) and you can give them any values, formulas and functions. On their own, because they don't refer to anything in your component, they do nothing but when linked to other attributes, they become very powerful.
Why would you create a custom attribute? Well, they might be used to define something which has no existing attribute, such as the spacing of rungs in a ladder, but they might also be used to represent existing attributes. What would be the point of that? Well there are several reasons:
- To give a more logical name to an attribute: "Height" might be more obvious to you than "LenZ"
- To shorten the name of a long attribute for use in formulas, eg. "Battlements!material" to "BMcolour" (If you're puzzled by the exclamation mark, I shall explain this below).
- To refer to a deeply nested subcomponent. (If you have a subcomponent within a subcomponent within the top component, you can only refer directly to the attributes of the next level down.)
- To differentiate identical subcomponents. (If you have the same component repeated in a DC, they will all have the same name.)
- To allow users to choose attributes from a menu or enter values.
The exclamation mark
If you have used spreadsheets, you may have come across the exclamation mark in formulas when referring to different sheets. They work in a similar way in SketchUp.
Since every subcomponent, as well as the main component, has their own set of attributes, you need some way to refer to, for example, the window's RotZ instead of the wall's RotZ. So you enter the component's name first, followed by the attribute name, separated by the !. You can think of it as the equivalent of "apostrophe-s-space" so "Window!RotZ" means "Window's Rotz". If the formula is referring to its own subcomponent's attribute, in the sense that our onClick was in the "window" and referring to the "window", the first part and the ! are not necessary.
If you click on the attribute name when entering attributes in formulas, SketchUp automatically adds the prefix and ! if necessary.
Amending DC1
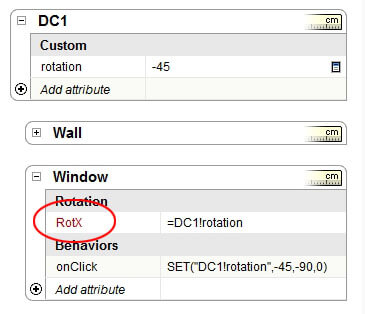
To introduce you to custom attributes, we will add one to our DC1 model which also gets rid of the "linked" windows problem. Open the DC1 file, click on the dynamic component and open the attributes window. In the top component (named "DC1"), click where it says "Add attribute". The attribute menu pops up but you'll also notice the "Add attribute" wording changes to "Enter name". Ignore the menu of attributes and just type the name of the custom attributes in this box and press return. (I shall name it "rotation".)
This attribute is going to hold the rotation of the window, that is, the window's RotZ value. So click in rotation's field and enter the value zero. Now we have to link the RotZ attribute so that it is using the rotation value. Delete the value from RotZ and enter:
=DC1!rotationFinally we have to amend the onClick so that it is changing rotation instead of RotZ so change it to this:
SET("DC1!rotation",-45,-90,0)Now create multiple copies of our new component and click on the windows. They should all open independently. (I'm guessing that custom attributes are stored separately for each copy so they can have have different settings. Maybe a SketchUp expert can confirm this.)

If your component doesn't work, check your values with the screenshot below.

If it still doesn't work, I have uploaded to 3D Warehouse (named "DC2"). The link is:
https://3dwarehouse.sketchup.com/model.html?id=uafd2d6fb-4d03-4f14-9cbc-cc9648981d1c or you can download the zipped file from this website by clicking here.
A look as axes
(That is, the plural of axis, not the chopping tool)
When creating the window in the last lesson, you might have wondered how to have the window rotate differently, such as with a horizontal axis, or from the centre, like a revolving door. It is simple to achieve this, and you just have to understand about the axes.
In any SketchUp model, you will be aware of the document's axes, the red, green and blue lines that appear in the middle of the screen and control the snapping when drawing. But you may not be aware that every group and component has its own axes which is independent of the document's. To see this, create a simple cube and group it. Then rotate the cube. When you double-click to open and edit the group, you should see that it has its own red, green and blue lines which now point in different directions from the document's.
Many of the attributes of a dynamic component are related to these axes: the X, Y and X positions are measured from the crossing of these axes, the rotations are around it and the lengths are measured from it (if you make something smaller via attributes, the axis end stays fixed and the other end gets shorter). So, if you need to rotate from a different point, you just have to open the group/component and redraw the axis. (To find out how to move axes, check the SketchUp documentation.)
You can practise by repositioning the axes of your cube and entering different positions and rotations in the attribute window.
Therefore, to change how the window rotates, just go into the window subcomponent of the DC1 model and move the axis. To get the window to rotate like a revolving door, move it to the centre; to get it to rotate from the top (like a letterbox flap), move the axis to the top and move the formula to the RotX attribute (see below).
Top axis window


Centre axis window

