 SketchUp
4. Creating an opening & closing window
In the previous lesson we found out how to enter simple formulas so let's put this into operation by creating our first "real" dynamic component. Note that most of the components we create will be simple shapes, not realistic furniture or doors. This is so we can concentrate on how the DC works and not what it looks like. Once you learn the principles, you can then turn them into an actual wardrobe or car or window.
Entering spreadsheet functions
The formulas we have entered up to now have been simple ones such as "=LenX/3". But, as anyone who has used a spreadsheet knows, there are dozens of more complicated formulas (functions) which you can enter. SketchUp has many of these and some of them you will use regularly. You don't have to enter these by hand though. They are all available in the Attributes window.
Open the Attributes window and then create a component or group. Select it. At the top of the window, you will see two tabs: Info and Functions. You might think (I certainly did at first) that changing these tabs would change the whole Attribute window but it actually only changes the grey area immediately below (as you can see in the images below).

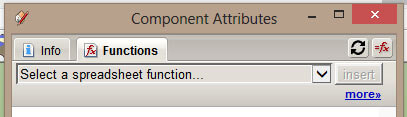
"Info" is selected by default and gives you information on the attribute that you select or are in. But if you click on "Functions", you see a drop-down menu with "Select a spreadsheet function..." and a button ("insert") beside it. To add a function, add any attribute to your component, and, with the attribute field empty of any contents and the cursor within it, select any function from the drop-down menu and click "insert". The function should be entered into the attribute field. (As you progress, you will learn many of these functions and you can type them in by hand.)
Obviously you cannot just use any old function in any position. Many only work with numbers so could not be used in text attributes like "Summary". The above operation was just to show how to select and insert a function.
Creating an opening window
So now let's go onto creating a real dynamic component. We shall create something which is very simple but very compelling to watch: an opening and closing panel.
If you've downloaded some DCs, you might have found this already: a car or a wardrobe with an opening door, or an opening window. All this is is a change in the rotation attribute (usually RotZ) of the door/window.
So start a new document and create the two shapes below, a wall and a window. The sizes are unimportant as long as the window is exactly the same size as the hole in the wall. Notice also that the objects do not have any depth (LenY) – they are just two-dimensional objects. For this example, it is actually easier not to have any depth but it doesn't matter too much if it has. Make sure each is a separate group or component name "wall" and "window". (You name a group by choosing "Entity Info" from the Window menu or right-click menu, and entering something into the name field.)

Now move the window so that is fits exactly into the hole in the wall (it should snap into place). Then select both objects and create a component (call it "DC1"). Open the attribute window and select the component.
Up to now we have been dealing with one group/component at a time but this time you will see a nested component. Dynamic components are usually composed of other smaller groups or components (which I call sub-components). You can have individual shapes (non-groups/components) within a dynamic component but you have no control over their attributes so you will normally make every separate object within a DC either a group or component.
If you have used the names I suggested, you should see the three objects in the attribute window, with the primary component ("DC1") at the top and "window" and "wall" indented beneath (to show that they are sub-components of DC1.
You can change the name given to the objects by double-clicking on the name in the attributes window – very handy if you have several identical sub-components such as wheels.
First test it by expanding the "window" sub-component and add the attribute "RotZ". It should be zero. Now enter "-45" and press return. The window should open towards you. (Negative numbers rotate clockwise, positive rotate anticlockwise.) Undo or enter zero so the window is closed again.
Now we need to add the ability to open and close the window with the Interact (pointing finger) tool. Basically we want to set the RotZ to -45 on the first click, then -90 on the second click, and back to zero on the third. For this we need to use the OnClick attribute. The OnClick attribute controls what happens when you click with the Interact tool. So, in the window sub-component, add the attribute "onClick".
Note that we added it to the "window" sub-component. This means that you have to click on the window to open it. We could have added it to the "DC1" primary component and then we could have clicked anywhere on the wall or window to open it. But that would cause problems if we wanted another animated object in our component so we normally add the onClick to the thing to be animated.
With the cursor in the onClick attribute field, click on Functions at the top, select "SET(attribute, state1, state2, ...stateN)" near the bottom of the menu and click insert. This function is used to change any attribute, in this case by clicking. Change the default text in the onClick attribute to show exactly this and press return:
SET("RotZ",-45,-90,0)A VERY IMPORTANT NOTE: The attribute in the SET function (RotZ) must be enclosed in quote marks or it won't work. If you click on an attribute name to enter it without typing, the quotes will not be added. If your animation doesn't work, always check first to see if you have missed out the quotes.
A LESS IMPORTANT NOTE: Notice that SET doesn't have an equals in front of it. It is a behaviour, not a formula.
If you now select the Interact tool and click on the window, it should change with every click from closed, to half open, to open, and back to close. (Note that we entered -45, -90, and 0; when SketchUp gets to the zero and we click again, it automatically goes back to the first value and shows -45.)
If it doesn't work, check that your attributes look like the screen below:
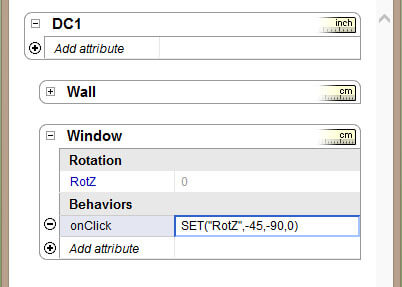
If you still can't get it to work, I have uploaded the component to the 3D Warehouse at https://3dwarehouse.sketchup.com/model.html?id=ubf42b594-eb3a-493b-b384-ce8225658b5c (with a bit of texture) so you can download it and see how it differs from yours. Or you can download the zipped file from this website by clicking here.
Other Animations
The problem with this component at the moment is that the window jumps open rather than through a nice smooth animation. To improve it, we can use one of the animation functions (ANIMATE, ANIMATEFAST, ANIMATESLOW AND ANIMATECUSTOM). All, apart from the last, have the same structure. You could delete the SET function we have used and insert one of the animate function, or simply type "ANIMATE" where it presently says "SET". That is:
ANIMATE("RotZ",-45,-90,0)If you do this (remembering the quote marks around the attribute), you should see the window open and close smoothly when you click on it.
The differences between these functions are:
- SET Attribute jumps between values. Best for attributes with no intermediate values (such as the HIDDEN attribute which is either true or false), or where you aren't interested in smooth animations.
- ANIMATE Attribute changes evenly over half a second.
- ANIMATEFAST Attribute changes evenly over a quarter of a second.
- ANIMATESLOW Attribute changes evenly over one second.
- ANIMATECUSTOM Allows you to customise the animation, changing the speed and the easing (acceleration).
Try changing the function to each of these animations (you may want to leave the ANIMATECUSTOM to a later date) to see their effects.
You can see how just a single line in one attribute can create a pleasing effect. We can also use these functions for more elaborate animations such as sliding doors, cars which drive by themselves and complicated movements. But, for now, just play around with different shapes and animations until you are happy with this procedure.